Design and Create your own Christmas Packaging in Silhouette Studio
Design and Create your own Christmas Packaging with the Silhouette Cameo
This post is kindly sponsored by Design Bundles, all comments and opinions are my own.

Hi there, since Christmas is just a few weeks away, i’m trying to be a little more organised this year, so I thought I’d have a go at creating my own Christmas Packaging with design elements from the Christmas Craft Bundle III from Design Bundles.
That being said, I’ve managed to create not one, but three Christmas Packaging Ideas and I’m pretty pleased with myself too. Here, i’m going to show you how I have created these, and how you can too. I promise you the hardest part will be choosing which designs you want to use!

Please note: You will need a colour printer to complete this tutorial.
Design some Christmas Wrapping Paper/Gift Wrap in Silhouette Studio (No cutting required!!)
I chose the Christmas Collage from the Christmas Craft Bundle, I thought it was a nice but simple design to get us started.
First open the design in Silhouette Studio and reduce the size to your requirements, if you wish you can use the dimensions in my example below.

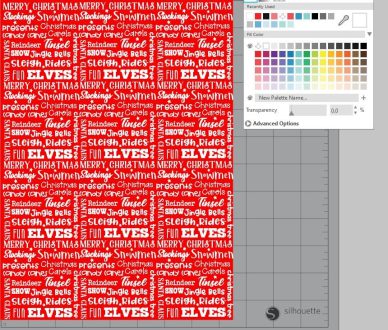
The next step is to Replicate the collage. Go to, Object, Replicate, Duplicate Right – Repeat this step again until the width of the page is covered. Before we go any further, select all of the newly replicated collage parts, and group them together (right click on the selection and click group), This will make it easier to perform the next step.
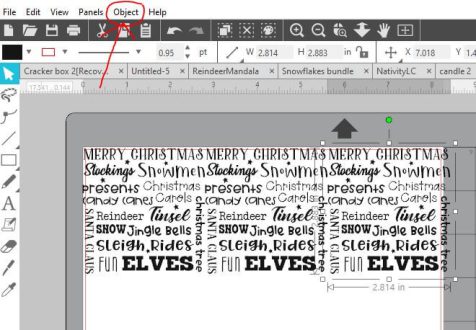
This next step is fairly similar to the previous step, only this time we are going to use the Replicate below option. Select the collage that we’ve just grouped together, then, go to Object, Replicate, Duplicate Below. Repeat this step until the length of the page is covered. As we did previously, select all of the collage parts and group them together.
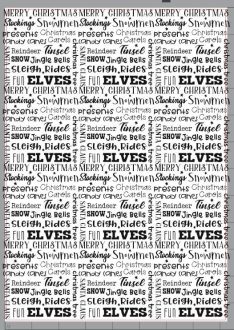
Next up, draw a rectangle, approximately the size of your print area like below. Fill colour this in Red (or any Christmassy colour you like, I chose red as this is my go to Christmas colour for everything!) You’ll find that the rectangle covers the text, right click on the rectangle, and choose send to back, you text will now be at the front.

I then selected the text and changed the fill colour to white (you can colour the text in any colour you like!)
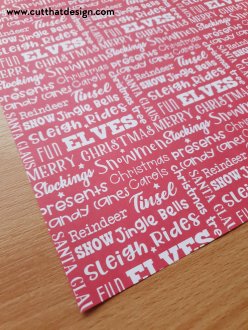
Your wrapping paper is now ready to print!
Go to File, Print, set your preferences as per your printer options if you haven’t already. Print as many copies as you like. As I only have an A4 printer i’m a little restricted so printing a few pages allows me to tape them together to form a bigger piece.
Designing and using your own gift wrap saves on all the wastage that comes when wrapping up gifts.
Here’s our own printed gift wrap in action, with some sparkly gold ribbon to finish the look off.

Packaging Design 2: Christmas Cracker Box
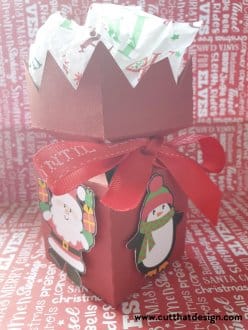
For our 2nd Packaging Design I’ve created this Christmas cracker box, perfect for adding sweets, chocolate, homemade cookies and any other small gifts.
I’ve used A4 card for this, however if you have 12×12 card you’ll be able to make yours bigger or cut more than one box at a time.
For this creation I have used some of the cute Christmas Characters from this set below, currently available in the Christmas Craft Bundle III

First Click Here to Download the Cracker Box File (this includes both SVG and DXF files).
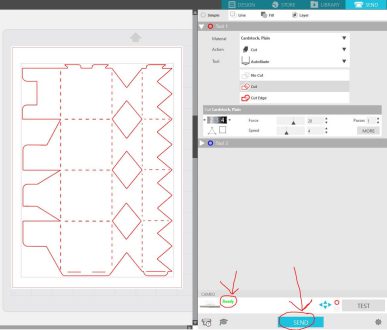
Next up, we will cut the Box Template. Unzip and open the Cracker Box File, it should look something like below.

Load your Cameo with whichever colour card stock you would like to use, and send to cut.


Take the box template off the cutting mat carefully. Put it to one side whilst we do the ‘Print and Cut‘ part of this project.
Cracker Box Tutorial; Print and Cut in Silhouette Studio
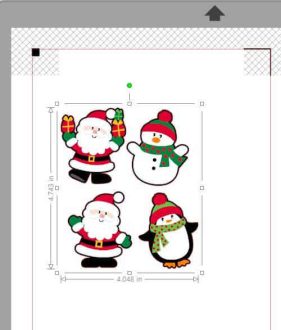
In Silhouette Studio, open The Christmas Craft Bundle Vol3 Designs folder, navigate to the ‘Christmas SVG Files‘ folder. Open the Santa B, Santa C, Penguin and the Snowman Designs.

For each of these character designs, I have added an offset of 0.125, this is to make the design ‘POP’ a little more, you can do this but you don’t have to. After the offset has been applied, select both the design and the offset, and group them together (right click, group). Do this for all the characters.

Create a new document (File, New), Select your character and copy and paste into the new document. Do this with the remaining three characters.
Reduce the size of the characters to the dimensions shown below (height: 2.247 inches), or if you’ve adjusted the size of the cracker box, i’d suggest adjusting the size within the cracker box template in Silhouette, then move the characters in to the New Document we’ve just opened.
Use the Page Setup up details as below;


The designs are now ready to be sent to the printer. Don’t forget to load your printer with card stock of your choice, and remember to group all the characters together (the cut feature will not work properly if they’re not grouped together).
Once printed load up your Silhouette with your print and click send. Remember to always ‘Cut Edge’ when dealing with Print then Cut!
Click send


Remove all the characters from the cutting mat and leave to one side. Start constructing the box template you previously cut out.
I would suggest folding the parts before putting it together. As shown below. I found this was so much easier and made it more durable.

If you’re stuck with how the base goes together, please follow the example below:


Push the base down from inside the box, to make it more secure.
![]()
Now you can add the cut out characters to your box. Use any adhesive you like, I used foam pads to give it that 3d effect.


Finishing touches: Add some ribbon and tissue paper, oh and don’t forget the gift. I filled this box with some yummy chocolates!
Packaging Design 3; Reindeer Box
This next creation (which I named the Reindeer Box due to the Reindeer on the front), is very similar to the Cracker Box above. The only difference is this box is held together with ribbon via the slots in the top of the box, so you’ll definitely need some ribbon to complete this project.

Before you start Click Here to download the Reindeer box file (this includes both SVG and DXF files).
Unzip the file and open it in Silhouette Studio, load the card stock of your choice and send it to cut, you can refer to the ‘Cracker Box‘ section of this tutorial for further guidance on cut settings for the box.
Put the box to one side. We are now going to do the Print then Cut part of the tutorial. There was something slightly different to this file, when sending it to cut the first time the cut lines weren’t right (even on the ‘Cut Outline’ option), so I made a slight change which corrected the issue, and which I’ll go through below.
Reindeer Box Tutorial; Print then Cut in Silhouette Studio
In Silhouette Studio, navigate to The Christmas Craft Bundle Vol3 and open the Reindeer file as shown below:

When you first open it, it looks like the below, we only want the design on the left of the screen, so right click and un-group. You will then need to select all of the design we are using, but none of the other parts on the page (as shown below).
The grey bounding box, and the smaller boxes within that design show that they’re selected but not yet grouped. Right click and group them together.

Next up we need to resize the design, copy and paste into the box file template in Silhouette Studio and adjust the size, or to save time use the dimensions below (only do this if you haven’t resized the Reindeer Box File).

Open a new page, this will be our Print then Cut page. Copy and paste the Reindeer design in to this new page.
Here’s where we have to make a little adjustment to the design, as the black outline is an outline and not a square, and the white area is in fact transparent the print and cut feature wasn’t recognising the outer square, meaning it was wanting to cut everything within the boxed area, which is absolutely fine if you’re cutting. So here’s a little workaround to make it Print then Cut compatible.
Ungroup the design. Then click on the black outline, right click and select ‘Release compound path‘.
It will look at little something like below; but don’t panic, it’s fine!

Believe it or not there are 2 squares in there. The larger square is at the front, so the first thing we need to do is – Select the black area, right click, and select send to back. Now the smaller square is at the front but you can’t see it yet, but trust me it’s there.
Click the centre black area again, and using the fill colour option choose the white colour. It should now look like it did previously, only this time there are two squares and not just an outline. Select the whole of the design again and group it together.
Duplicate the design 4 times using the Replicate tool (object, Replicate, Duplicate Left). Repeat three more times.
Set up your Page for print and cut, ensure the designs are within the print area as shown below. Group all of the four designs together. 
Print them, then load up your cameo once printed and send to cut. Remember to choose Cut Edge.

If you haven’t already, construct your box, and add the reindeer designs, again i’ve used foam pads, however you can use whichever adhesive you prefer.
Use ribbon to close the box using the slots in the top of the box, i’ve also used some glitter glue to add a bit of sparkle, because who doesn’t like a bit of sparkle at Christmas?
I really hope this tutorial has inspired you to create some awesome Christmas Packaging. I would love to see what you have created using this tutorial, so please feel free to share with me by emailing me at: blog@cutthatdesign.com – the same goes if you have got any questions about this tutorial.
Have a great Christmas and Happy Crafting!
Vicky xx