
Design a Shamrock in Silhouette Studio….from a Heart Shape? | Free Heart SVG/DXF File
Design a Shamrock in Silhouette Studio….from a Heart Shape?

It’s been a while since i posted a ‘proper’ design tutorial, it’s been so long, Silhouette Studio V4 had only just come out. For this post, I was inspired to design a Shamrock from a heart shape I had, probably due to all the St Patrick’s Day Freebies i’ve added to the blog recently. So, I thought i’d share this little tutorial with you!

Now first off, if you haven’t got your own heart shape, you can use the freebie heart shape i’ve provided below, just click on the ‘Free Download’ banner at the end of this post and the file will download instantly.
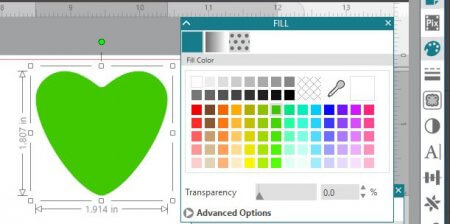
Once you’ve downloaded and saved open up the file in Silhouette Studio. It should look a little something like this (adjust the size accordingly):

For the purpose of this tutorial I changed the colour of the colour of the heart to green, it’s entirely up to you whether you do this or not.
With the heart selected (the bounding box, shown in the above and below image indicates when an item is selected) go to Object, Replicate, Rotate Two Copies, this will copy the heart twice, and rotate them so you end up with 3 hearts (or leaves, as these are what will form the leaves of the shamrocks)

Don’t panic, it will look like the below image, that’s due to each duplicated item has been placed on top of the other.

Move each of the objects (there should be 3) – See now they don’t look as bad.

Arrange them to form the clover, as you can see here, the heart on the bottom right needs to be rotated again. To do this, click and drag on the small green circle until it mirrors the leaf on the right.

Basically your rotated leaf should look something a little like this.

Move the leaves towards each other, so they are overlapping in the centre. I’ve turned on the ‘Red Lines’ shown below so I know there overlapping, and it makes it easier for me to know whether they’ve been welded or not. (you can turn the red lines on by clicking on the red box to the top of the image below)

Select all the ‘leaves’ and click, Object, Modify, Weld.
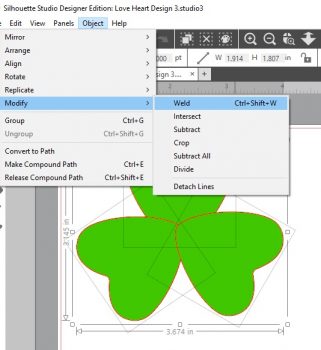
It should look a little bit like this……

Now for the stem…
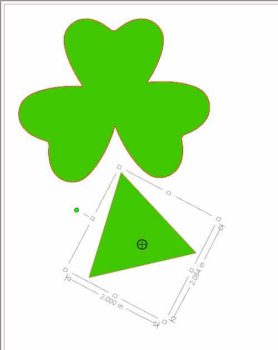
Draw a polygon using the polygon tool, click and drag your mouse to form the polygon.

The slider in the centre of the Polygon is indicating how many sides the shape currently has. We want to draw a triangle so click on the slider and drag it to the left to number 3.
Once you’ve done that, right click on the triangle and click ‘Convert to Path.’

Next up Rotate the triangle so it’s in a similar position as to where it is in the below image.
Select the triangle, and then click on the edit points tool, which is located to the top right of the image below (the little square with the two lines coming from it)

Little nodes (grey boxes) will appear to each point of the triangle. Click on the point to the bottom right of the shape, once selected the small node (square) will turn white.

Click and drag this node towards the other node to the bottom left of the shape.(as shown in the image below), we are forming a stem so it will need to look thinner than the original triangle above. 
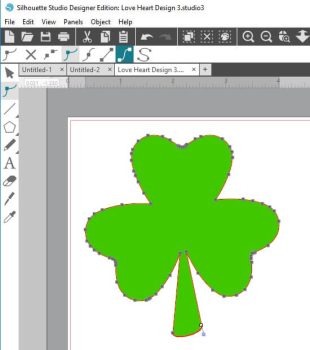
Position the stem over the top of the leaf shape we have just created, select all got to object, modify and weld.

Once welded, click on one of the nodes at the end of the stem, stay in the Edit Points tool, and click on the wavy line with the 2 squares at either end, (highlighted in blue below.) Click and drag on the little anchor point that has been added to the end of the node, this will make the edge a little rounder and less sharp. Adjust the anchor points until you are happy with the ’roundness’ of the stem.
Here’s my finished stem for guidance, once i’d adjusted the node on the right of the stem, i lifted the node on the right up a little bit.

There you have it your own Shamrock Design, created from a heart and a triangle. Just add your own quote and your ready for St Patrick’s Day. (The below design is an example and is not included in the download)

The font used in the above image is my own font, which you can purchase and download from my Font Bundles Store, just click on the image below:

Download the FREE Heart SVG/DXF File below. So if you have the Basic Edition you can still complete the tutorial.
Thank you so much for reading, I really hope this post has inspired you to experiment with designing in your Silhouette Studio Software. If you want to stay up to date with my tutorials and freebies then please feel free to follow me on: Pinterest,Facebook or Instagram or sign up to our mailing list below.
Happy Crafting
Vicky xx