How to weld a word to an object in Silhouette Studio
Following on from my previous post; Using the Knife tool in Silhouette Studio to Design an Arrow and how arrows are very popular at the moment, I am going to show you how you can go one step further in your design by adding a word to your arrow design.
Here I have used the weld tool and Knife tool in Silhouette Studio to attach ‘Bride’ to the centre of the arrow.
Firstly, open your arrow design, I am using the arrow I created for my post linked at the top of this post.
Using the Text Tool, select your font and type out the word you want for your arrow, a script style font usually works better.
The font I am using for this example is Blingtastic Script by Seniors Studio and available from The Hungry JPEG – Commercial License Included*
Right click on your word and select convert to path, position your word in the middle of your arrow. Adjust it to whatever size you want, if the font looks a little too thin you can use the offset tool to offset it slightly.
In this example I have used an offset of 0.005, this will also weld the words together without you have to use the weld tool, if you haven’t used the offset tool, you will need to weld your words together, Select the word, right click, and select weld.
Your word should look similar to my Bride word below, where all the letters are attached and have a nice flow to them.
Using the knife tool, cut the part of the arrow, just outside your word, as shown in the image above.
Delete the middle cut piece, once you’ve done that, you may need to adjust your word slightly so it overlaps the front and tail of your arrow.
Next, select all, Right Click and Weld. You should have something that looks like the image below.
If you are happy with your design then that’s all there is to it. If however you want to make slight adjustments, I’ve added a step three, where I have used the edit points tool to adjust my design a little.
Looking at the welded word and arrow (above), I want to make where the ‘e’ meets the arrow a little more curvier, we can do this by using the Edit points tool.
Click on the Edit points tool (Located in the left tool bar, circled in red in the image below), you will see lots of points (AKA nodes), I want to delete the point shown below in the red circle, I will click on it, and select Delete point – You have to select the point first before the Delete Point option becomes clickable.
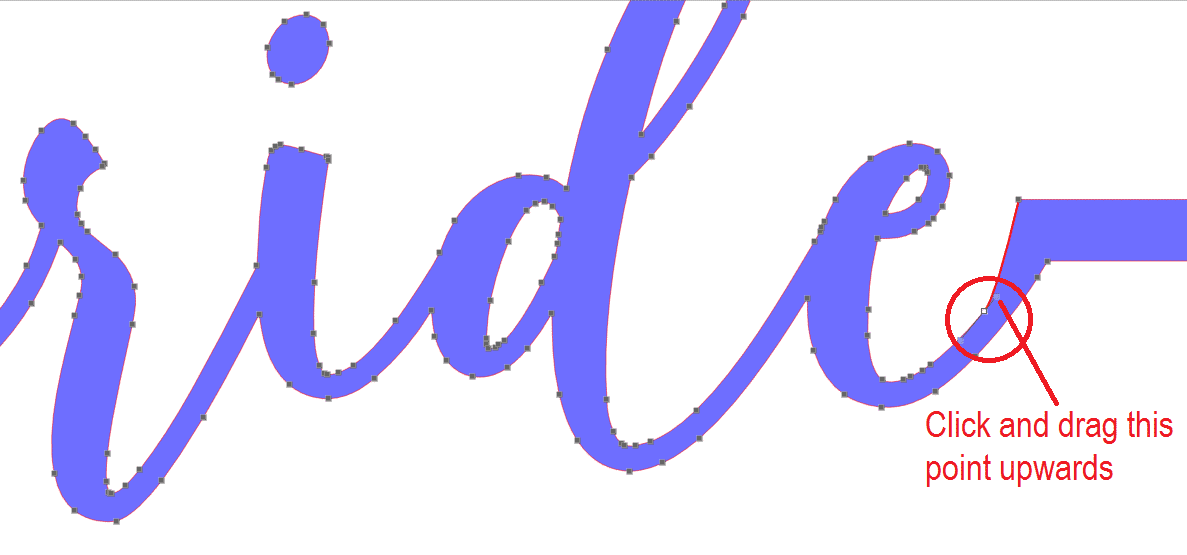
Now the point has been deleted, I’m going to click on the next point down and adjust the ‘handles’ that are protruding from the point I have just clicked on. I’ve clicked and dragged it upwards, and I’ve also moved it to the left a tiny little bit so it blends in more.
See how it’s made it that little bit more curvy?
This is the end result:
Using the edit points tool you could go one step further and adjust the points of different parts of the arrow, to make it look less uniform and straight. Here’s one example,using the ‘Make Curve’ option in the Edit Points tool:
Thank you so much for reading, I really hope this post has inspired you to go that step further with designing in Silhouette Studio. Feel free to share your creations with me on Pinterest, Facebook or Instagram, I’d love to see ?
*This post contains an affiliate link, by clicking and purchasing via this link I receive a small commission. This allows me to continue to offer you Free cutting files as well as bringing you tutorials and other exciting things to do with your Silhouette and Cricut Explore machines.
Happy Crafting
Vicky


